By Norm Myers, Computers Editor
HOW A MICROCOMPUTER WORKS
In the last two issues we talked about the Altair 8800 which is a microcomputer based on the Intel 8080 microprocessor. The Altair, with its 65,536 words of memory, typewriter interface capability, and full complement of software packages, is a complex and powerful machine.
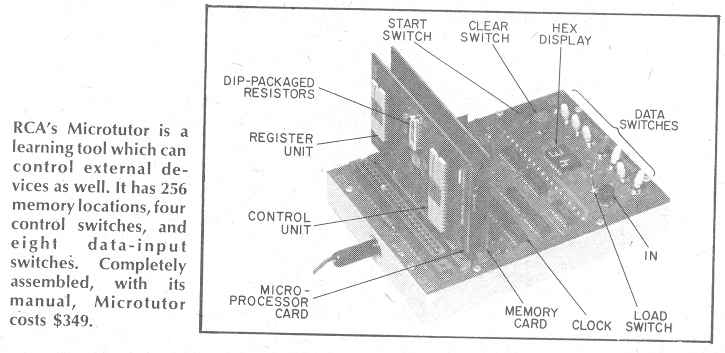
The microcomputer we will describe this time is different. It is small enough to fit in your coat pocket yet it is programmable, accepts over 40 instructions, has a small alpha-numeric readout, and can be used for many things from playing computer games to controlling exetrnal electrical devices. With some imagination you could make it control your model railroad or your holiday lights.
 A New Smaller Computer.
This unit is called the Microtutor, is made by RCA, and comes
assembled and ready to go. The integrated circuits (ICs) are neatly
fitted into the printed circuit layout on the three boards in this
computer. The base, about 5 by 6 by one inches, overall, contains the
clock, power supply, logic circuits, switches for inputting information,
and a two-digit LED display for visual output all on one board.
In addition there are two smaller boards containing components.
These boards are called cards, and they have pin connections on one end
that plug vertically into sockets on the base. One card contains the
microprocessor, the other the random access memory (RAM). There is an
empty socket on the base which provides electrical access to the data
lines and other portions of the microprocessor. This access permits
testing as well as control of external devices. The Microtutor Manual
explains in humorous style the basics of what the unit can do and how
to write programs for it. A program that I call Password is shown later
in this article. First though, let's look at the Microtutor hardware,
the hexadecimal code which it uses, and a block diagram operation
of the unit.
A New Smaller Computer.
This unit is called the Microtutor, is made by RCA, and comes
assembled and ready to go. The integrated circuits (ICs) are neatly
fitted into the printed circuit layout on the three boards in this
computer. The base, about 5 by 6 by one inches, overall, contains the
clock, power supply, logic circuits, switches for inputting information,
and a two-digit LED display for visual output all on one board.
In addition there are two smaller boards containing components.
These boards are called cards, and they have pin connections on one end
that plug vertically into sockets on the base. One card contains the
microprocessor, the other the random access memory (RAM). There is an
empty socket on the base which provides electrical access to the data
lines and other portions of the microprocessor. This access permits
testing as well as control of external devices. The Microtutor Manual
explains in humorous style the basics of what the unit can do and how
to write programs for it. A program that I call Password is shown later
in this article. First though, let's look at the Microtutor hardware,
the hexadecimal code which it uses, and a block diagram operation
of the unit.
 Basics.
Microtutor is an 8-bit computer whose heart is the RCA CDP1801
microprocessor. It's made up of two plug-in ICs; the control IC and
the register IC, both of which are mounted on the same plug-in card.
RCA also has a CDP1802 which can handle more instructions than the 1801,
and is on a single chip, but the basics of the 1801 and 1802 are the same.
The control chip of the 1801 receives control signals from the clock
and in turn controls the movemement of instructions and data through the
register chip and into the RAM. There are 256 memory locations available
in Microtutuor although an 1801 can address up to 65,536 locations.
Basics.
Microtutor is an 8-bit computer whose heart is the RCA CDP1801
microprocessor. It's made up of two plug-in ICs; the control IC and
the register IC, both of which are mounted on the same plug-in card.
RCA also has a CDP1802 which can handle more instructions than the 1801,
and is on a single chip, but the basics of the 1801 and 1802 are the same.
The control chip of the 1801 receives control signals from the clock
and in turn controls the movemement of instructions and data through the
register chip and into the RAM. There are 256 memory locations available
in Microtutuor although an 1801 can address up to 65,536 locations.
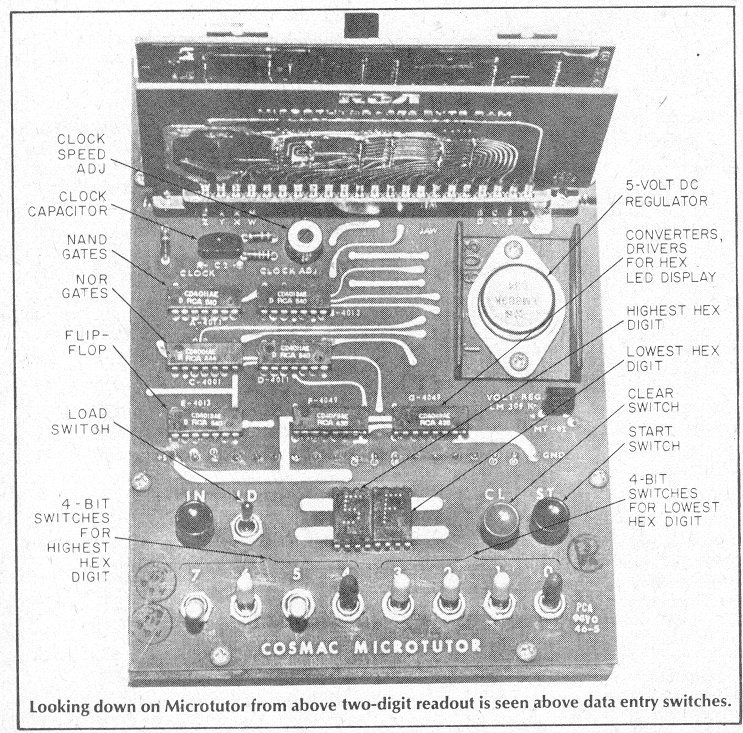
There are four control switches and eight data switches. Let's look at the four control switches: Clear, Start, Load, and In. The Clear button returns the microprocessor to the first instruction of your program and lets it sit there. The Start button begins execution of the program. The Load toggle switch is turned up when the program steps are entered and down when the program is to be run. The In button is pressed once for each instruction or data wword to be loaded. An instruction or data word is selected with the 8 "data" switches (these are toggles) and then In is pressed. Each press of In causes the instruction or data word to be entered into the next available memory location in the RAM. Also, as In is pressed, the values set on the data switches are displayed on the two digit LEDs.
What's Hexademical Counting? How can these 8 switches (corresponding to 8 bits - a bit being either 0 or 1 in compuuter language) give a two-digit alphanumeric readout? Simple - the eight are divided into two groups of four each. With this arrangement, setting the 8 switches to 0001 0010, for example, would cause 1 and 2 (that's 1, 2 - not twelve) to show on the LEDs. All is well, you say, until 1001 1010 is set on the data switches. The value of this setting, when converted from binary to decimal, is "nine, ten." How can we show "ten" on a single LED? Bring in the letters A through F: Letter A is ten, B is eleven, etc. This form of couting is known as hexadecimal, which means sixteen in Greek. (Apparently it was invented by programmers with sixteen fingers!) The Altair microcomputer in our Sept.-Oct. Issue used octal code - groups of three bits are used. Here, the Microtutor uses hexadecimal - groups of four bits are used. Octal is a little easier for the user to work with, but "hex" simplifies the computer hardware because the RAM is readily set up to take four bits at a time.
| Binary Code |
Hexadecimal Code |
Decimal Number |
|---|---|---|
| 0000 | 0 | 0 |
| 0001 | 1 | 1 |
| 0010 | 2 | 2 |
| 0011 | 3 | 3 |
| 0100 | 4 | 4 |
| 0101 | 5 | 5 |
| 0110 | 6 | 6 |
| 0111 | 7 | 7 |
| 1000 | 8 | 8 |
| 1001 | 9 | 9 |
| 1010 | A | 10 |
| 1011 | B | 11 |
| 1100 | C | 12 |
| 1101 | D | 13 |
| 1110 | E | 14 |
| 1111 | F | 15 |
Loading the Memory. An analogy helps to explain what Microtutor (as well as most other computers) does in storing and executing instructions. Imagine the computer's memory to be an office mail box made of pigeon holes - lots of little, stacked, square boxes. There are 16 "pigeon holes" in this memory down the side and 16 along the top, a total of 256. To address the hole designated as 0, 0 (first row, first column) you push the Load switch up and set the data switches at 0000 0000. Now in that pigeon hole you put the blank instruction "0 0" which happens to be needed to start all Microtutor programs. Then move to the 0 1 hole and place an instruction in there, such as "F8" (more on instructions in a minute). Then move on to the 0 2 hole and put an instruction in there. Continue in this fashion, and when you have finished loading the pigeon holes with a sequence of instructions, you have written a program and placed it in memory.
To run this program, push the Load switch down, press Clear to get back to the 0 0 hole, and then press Start. The processor goes from one hole to the next, doing as the instruction in each hole directs - such as, "add 5 to the number in the next hold, and store the result in hole 2 1."
 Block Diagram.
If we now look at a block diagram of the Microtutor we can understand
some of the instructions that we can put into the "pigeon holes," and then
we can write a useful (and fun) program. Remember, however, that block
diagrams are like stamp collections. That is, they're really dull until
you get into them, and then you're stuck. Too, block diagrams don't
answer detailed questions - they just supply general, over-all ideas.
Block Diagram.
If we now look at a block diagram of the Microtutor we can understand
some of the instructions that we can put into the "pigeon holes," and then
we can write a useful (and fun) program. Remember, however, that block
diagrams are like stamp collections. That is, they're really dull until
you get into them, and then you're stuck. Too, block diagrams don't
answer detailed questions - they just supply general, over-all ideas.
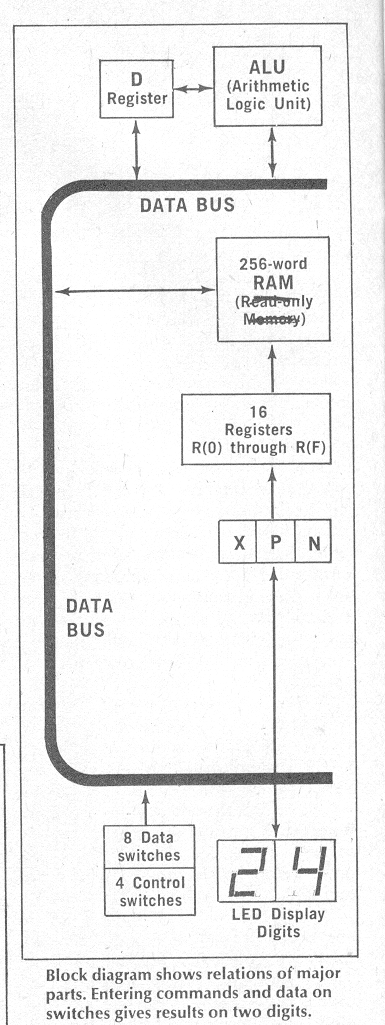
Looking at the block diagram you can see the eight data switches and four control switches that are inputs to the Microtutor. The two LED digits provide the visual output. The arithmetic logic unit (ALU) performs simple arithmetic (add, subtract, logical AND, etc.) on two 8-bit words. One word comes from the D register, which in turn got the word handed to it under some program control, and the other word is sent to the ALU by means of a memory location supplied by the program.
More Operation. The 16 general purpose registers R(0) through R(F) each hold an 8-bit word. (In the 1801 and 1802 microprocessors, these registers actually hold 16 bits, but Microtutor is designed on a smaller scale). These registers can be selected under program control either to hold data or to hold the loocation of a specific memory slot, like 0001 0010. One register is called the program counter. This counter directs the microprocessor to the memory location containing the instruction that is to be executed next. Normally, this counter just keeps incrementing (increasing) by one as each instruction is performed. But if a special branching condition is encountered during execution of the program, the program counter can skip over as many memory locations as it is directed and pick up an instruction many "pigeon holes" away. The register chosen to be the program counter is determined by the value in register P. If P contains 0101, then register 5 - written R(5) - will be the program counter. When Clear is activated it automatically sets P to zero, so register R(0) is normally the program counter, and Clear makes the value in R(0) equal to 0000 0001. Thus the program starts at the top of the memory.
Register X is important. Pay close attention, now, because this is a bit tricky. Any 4-bit value contained in register X for example, 1000, which is the binary for decimal 8 will be the number of the general register (like register R(8) in this example) which will contain the location in memory (like 0001 0010 could be in register R(8) ) of some data that is to be retrieved for use in the ALU or elsewhere. And that arrangement is a very good example, although a very simple one, of what computers go through as they run programs. It also shows machine-level programming requires a lot of steps to do one task. All those steps lend a lot of flexibility to the program making it easy to get in to make little changes without upsetting the whole apple cart. Finally, there is register N. It can be used, for example, to specify that an R reigster is to receive a data word, or to specify, indirectly, that a particular memory location is to receive a data word.
Writing A Program. Let's write a program we'll call "Secret Password" so that we can get to know some of the Microtutor instructions. Imagine that Microtutor is connected to your personal bank valut. To open the bank vault you set the 8 data switches to your secret password and press Start to run the program. When the proper password is selected, "00" will light on the LED-display - which will stand for "open, open". If a thief tries his hand at the combination and gets it wrong (his chance of getting it right just by guessing is one out of 256), "AA" will light - which will stand for "Alarm, Alarm!"
| M | CODE | Comments |
|---|---|---|
| 00 | 00 | Data switch values put into memory |
| 01 | E3 | |
| 02 | F8 | |
| 03 | 20 | |
| 04 | A3 | |
| 05 | 68 | |
| 06 | F8 | CB put in Register Memory equal to Register?
Yes: show "00" |
| 07 | CB | |
| 08 | F3 | |
| 09 | 32 | |
| 0A | 0D | |
| 0B | F8 | |
| 0C | AA | |
| 0D | 53 | |
| 0E | 60 |
Looking at the program listing you can see that the program is 15 steps long and uses memory locations 00 to 0E. Location 00 contains code 00 as required by all Microtutor programs. The program is loaded by setting the Load switch up, setting the data switches to the first code, E3, pressing In, and contunuing right on with F8, etc. Let's go through each step of the program which is really quite simple. First the value 3 is put in register X with the instruction E3. (If we had used EA, then A would have been placed in register X.) Remember that the value in the X register points to a specific general register to set it up for special work. In this case, R(3) has been chosen by using just one command, E3. Now the program is going to put the value 20 into the R(3) register. This is done by F8 followed by 20, which puts 20 in the D reigster, and then with instruction A3, which puts the contents of D into R(3). Now comes a very important instruction - 68. If you say "68" to a friend, probably nothing worthwhile will happen. But if you say 68 to Microtutor it will take the value set on the 8 data switches and enter that value into its memory at the location given by the value in register R(X). So in this case the memory location is 20.
Are You Still With Us? Now for the big question: Does the value set on the switches equal the secret password? The password in this sample program listing has been designed to be CB, and it is placed by instruction F8, into register D. The program now compares CB with the switch values by using instruction F3. To accomplish this the F3 instruction does an exclusive-OR operation (0+0=0, 0+1=1, 1+1=0) on the first bit of the password in register D with the first bit you have just put into memory via the data switches. The result of that exclusive-OR operation is put into a position in register D, and then instruction F3 goes on to the second bit and does the same thing, continuing through all eight bits. If the value set on the switches is CB, register D will contain 00.
Now we are almost done because step 09 in the program contains the instruction 32 which says "Hey, if D contains zeros, jump on down to step 0D." And there at step 0D and 0E the value in register D (value 00) is put on the LED display to say "open, open!". Returning to step 09, if the value in register D is not 00, that is, the value on the data switches is not exactly CB, the program goes to steps 0B through 0E which cause AA to be put on the display.
Flexibility. This program demonstrates a really key feature of microcomputers: Flexibility. For example, if you, as owner of the bank vault, want to change the password, you do not have to go through a massive rewiring effort. All you do is change CB at step 07 to something else. Also, if you want to make the password harder for a thief to crack, the program can be rewritten to require, for example, CB to be entered, followed by BC. This demonstrates the tremendous flexibility of these programmable microcomputers.
How To Get Started. The Microtutor Manual contains a list of twenty application ideas for the Microtutor, many of which use the control pins on the back which allow the 1801 microprocessor to operate relays, lights, motors, etc. Imagine your model railroad controlled by this microcomputer. Instead of seeing the train go from one circle to another in a repetitious way, Microtutor could make all sorts of things happen! You fill in the ideas! But of course, to make it work, you would have to add external relays and maybe some logic circuits, and write your own program.
A good way to start is to order the Microtutor Manual for $2.00 plus a shipping charge of $1.00. It contains wiring diagrams and software ideas. There are no large projects in the manual, just basic instructions, several short programs, and lots of ideas. Write to Microprocessor Marketing, RCA, Solid State Division, Somerville, New Jersey, 08876. The Microtutor Manual is designated MPM-109 on the RCA price list. The Microtutor itself is designated as CDP 18S011 and the price is $349. Of course, forming a club would let you share the cost of microcomputers with others. This is an idea that is catching on rapidly across the country.
Next Time. In the next issue you will get more hands-on computer experience when we take a look at yet another breed of microcomputer. Stay with us in future issues as we take off our shoes and wade through the micro-muck. We will review books and look at applications, trying to keep you abreast of this fast-changing field. And remember, your comments and ideas are welcome. Let me know if there is a topic you want to have covered in this column.